• Home
  • About Catherine Cheek
  • Writing Resume

Kater’s Art

artblog and writing resume

Category:

  • alternart
  • Art Journal
  • books
  • drawing
  • Glass
  • henna
  • pottery
  • Printmaking
  • Tiles
  • Uncategorized
  • wood

Archives:

  • August 2008
  • July 2008
  • June 2008
  • May 2008
  • April 2008
  • March 2008
  • February 2008
  • January 2008
  • December 2007
  • November 2007
  • October 2007
  • September 2007
  • August 2007

Blogroll:

  • Amalia Fisch
  • Black Wren Morris
  • BoingBoing
  • Bridget Cherie Harper
  • Caged Faeries
  • Ecstatic Days
  • Endicott Studios
  • Glass Maze
  • Jerome Stueart
  • Keyan Bowes
  • Livejournal
  • Lucy Snyder
  • Nick Wolven
  • Tender Comrade
  • The Blatantly Obvious

Meta:

  • RSS
  • Comments RSS
  • Valid XHTML
  • XFN

Nineteenth Century Swallow Shrine

July 24th, 2008 by admin

swallow-shrine-front.jpgswallow-shrine-three-quarter-view.jpg

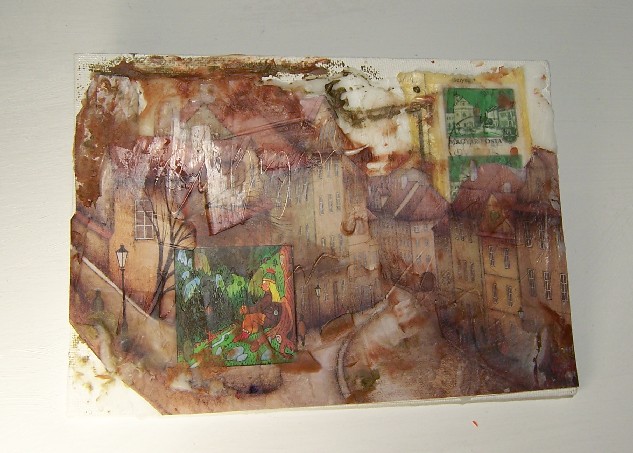
I spent last weekend assembling the base components for three more shrines, and today I finished decorating one of them.  I was originally going to have three shelves inside, each with something on it, but instead I experimented with multi-layered collage.

In the far background is a piece of a landscape. Originally I painted it myself, but I didn’t like my own painting very well, so I used one from a book on American painting.  I perused architecture drawings until I found this of the vaulted ceiling, and I cut a window so you can see the landscape behind.  There’s a quarter inch of foam core board between the landscape and the vaulted ceiling drawing, to give it depth, and there’s another quarter inch of foam core between the vaulted ceiling drawing and the sheet of plexiglass that has the small swallows adhered to the backside of it.  The larger swallow has more foam core behind it, so that it’s a little bit in front of the smaller ones.  The swallows are from Audubon.

I wanted something with a theatrical flair, something Victorian, which is why I did the flourishes on the outside in gold (stamped and embossed).  The curtains match the gold embossing powder.  I had to iron and sew them and play around with them a bit to get them to hang properly.

When I was looking for landscapes, I found a number of nineteenth century paintings.  I copied them and cut the copies into strips, collaging it onto the outside so that it would have the colors and brushstrokes of oil paintings, but not the subject matter.  I think the dark colors and reds go well with the purple trim.

Inside the attic, I put pages from a mystery novel, but I didn’t like the color of the paper, so I put different writing on top of it (purchased as part of a scrapbooking/collage paper sample pack.)  The obvious thing for the attic would be a bird’s nest, but I didn’t have one small enough, and I didn’t have any eggs even to go with the big one (except chicken eggs, which would be too large.) 

I did, however, have a small bottle I made in my borosilicate flameworking class, which unfortunatley had a tempering issue and lost its bottom. Not as obvious as a bird’s nest.  Works well enough.

Posted in alternart | No Comments

Encaustic adventures

July 17th, 2008 by admin

encaustic4s.jpg

Every time I see a new artistic technique or medium I have the urge to try it.  Such it is with encaustic, using colored wax.  I thought this would be a fun project to do with my children, becasue for the pigment we used crayons, and who doesn’t like crayons? 

Since we were experimenting, the way we decided to keep the wax hot was by putting it in a metal dish over some tealights.  For those of you playing the home game: don’t do this.  Not only does it not melt the wax or keep it liquid enough, but the metal dish gets burning hot.  Not only that, but we accidentally set the table on fire. (Good thing I had a spray bottle!) 

I’ve seen other collage artists advise using a quilting iron.  That sounds like an excellent tool, if I had one.  I do however, have a heat gun, and we enjoyed not just melting the wax, but watching it blow around with the puff of air from the gun.  Because the gun was the only thing that kept the wax melted, this was not a good three-person project.

The thing I love about encaustic with collage is the translucency of the glaze.  Images under the glaze look misty and faded.  You can also get fascinating textures. This was not a resounding success, but it was a nice start.  Next time I might try using my own images rather than cutouts of others’. 

I don’t think this will be my last experiment with encaustic, though it will be a while before I can make anything new, because my studio is a mess.

Posted in alternart | 1 Comment

Finished Mural!

July 13th, 2008 by admin

finished-mural-1.jpgfinished-mural-2.jpg

I’m so happy the mural is finally done, and I got the scaffold out of our foyer.  Painting the overglaze was the most difficult part of the entire process.  I was able to do some of it from the hall on the second floor, but then on the middle part I realized I needed a longer extension pole.  I tried from a ladder, but it was too wobbly.  Finally I got an extension pole from my parents, and by standing with one foot on the ladder and one foot on the piano, I was able to get the highest sections.  It wasn’t as smooth and clean as I had hoped; there are smears on the ceiling and some of the strokes are messier than I’d hoped.  Still, it’s unavoidable when you make the paint transparent (with glaze) that you’ll see some brush strokes.

The yellow leaves turned out nearly invisible–something I suspected might happen.  Not too much of a detriment.  Also, the glaze nearly made the crows disappear, so I rubbed them with a dry paper towel to get some of the glaze off and make them stand out more.  Except for the messiness near the ceiling, the mural turned out as I’d expected.  It has a rather gothic/halloween feel, I suppose, but for one month of the year that will be perfect.

Final note: the paint in the lower image is glossy because it’s still wet.

Posted in alternart | No Comments

Mural Progress

July 12th, 2008 by admin

mural-progress3b.jpgmural-progress3.jpgflying-crow-detail.jpgpractice-piece.jpg

This is the project I’m currently working on.  It’s pushed my other projects to the side, so I’m in a hurry to finish it.  I had to take a break when we went on vacation, but now I’m home again and I can see the final stretch.  You can see updates of the progress here. 

Originally, this foyer was painted with flat white, like the rest of the house.  I think I’m a teensy bit agorophobic, because the darker and more closed in a space feels, the more I like it (to a certain extent.)  I did a similar mural in our old house, based on an article in a magazine.  I made two stamps for the leaves, one small and one large. In the old house, I used the small stamps, which were about three inches wide.  These leaves are a little over four inches.  To give a point of reference, the high window is four feet by four feet square.

I painted the tree trunks and stamped the leaves in June, and a friend suggested I ought to add crows (my favorite animal) to the mural, so I spent a few days sketching crows. Once I had the sketches to the right size, I glued the sketch paper onto thicker back paper, then cut it out so that I could trace around it easily.  I painted them completley black, with glossy house paint.  I debated leaving them that way (because I am not sure if the glaze will obscure the details or not), but in the end I decided that they needed more depth.  I mixed some white paint with the same glossy black and used the grey for highlights.  Posted is a detail of one of the crows.

The next stage is to paint over the entire mural with glaze+paint.  I’ve got a picture of the canvas I used to test out the glaze and paint ratios.  The glaze (and a little water) gives it translucency so that you’ll be able to see the image behind it.  It has enough color to tie the room together, and having a background color closer to the branch and leaf darkness will make the whole effect more subtle.  The next stage is really the part I’m most worried about, because for one, all the brush strokes will show and I don’t want it to look too busy/messy.  Also, I don’t want the color too pale, yet I don’t want the trees so subtle that you can’t tell they’re trees.  I’ll post pictures of the completed mural. 

Posted in alternart | No Comments

First Stained Glass Panel

July 1st, 2008 by admin

first-stained-glass-panel.jpg

I took a stained glass class at a local shop, and this is what I created.  I’d never done stained glass before, though always figured I’d try my hand at it some day.  I have a picture window that really cries out for a large stained glass panel. Of course I have to make it myself, so I enrolled in a class to teach me how.

I have to say, it’s not what I expected.  I knew it would take some precision, but I didn’t realize it would take that much precision.  I knew it would be dangerous, but I didn’t expect to cut myself that badly or expose myself to that much lead.  (And stained glass is very pretty, but it can also slip easily into tawdry or dated if you’re not careful.)  It requires a lot of being precise, and a lot of careful attention to detail, and not a lot of creative expression: it’s more like woodworking than painting.  So I don’t know how much of this I’m going to do.

The main trouble with working in stained glass, besides the health risks, is that it’s terribly expensive.  There are a gazillion tools that you need, and a lot more that make things much easier.  I got some of the tools from Jane, but there were still other supplies that I had to buy. If I’m going to do more, there are even more tools that I’m lacking.  I also learned that the copper foil method (I do have copper foil) is more difficult (I don’t have a grinder to make things perfect if I screw up) and more expensive (uses a lot more solder.)  The leaded came method is more forgiving, but you have to work with lead, you need tools I don’t have, and putting the putty in afterwards is terribly messy.  The design I want for my picture window is probably going to take both.

I guess the moral of this story is that if you’re ever at an art show, and you see a stained glass panel that you like, buy it. It’s probably underpriced.

Posted in Glass | 1 Comment

 
Wordpress Themes by and Website Templates by Blogcut