• Home
  • About Kater Cheek
  • Writing Resume
  • Contact

Kater’s Art

artblog and writing resume

Categories

  • 48 Birds
  • alternart
  • Art Journal
  • books
  • Clarion
  • collage
  • doll/faeries
  • drawing
  • Glass
  • henna
  • Postcard
  • pottery
  • Printmaking
  • shrine
  • smiley ball
  • Tiles
  • Uncategorized
  • wood

Blogroll

  • Amalia Fisch
  • Black Wren Morris
  • Bridget Cherie Harper
  • Ecstatic Days
  • Endicott Studios
  • Kolby
  • Travis Heerman

Clarion 2007

  • Glass Maze
  • Jerome Stueart
  • Keyan Bowes
  • Nick Wolven
  • The Blatantly Obvious

My other sites

  • Coop De Grace
  • Livejournal
  • Occasionally Offensive

Meta

  • Log in
  • Entries RSS
  • Comments RSS
  • WordPress.org

Emu-Klear Drum

March 31st, 2009 by Kater

emu-klear-drum-2.jpgemu-klear-drum1.jpg

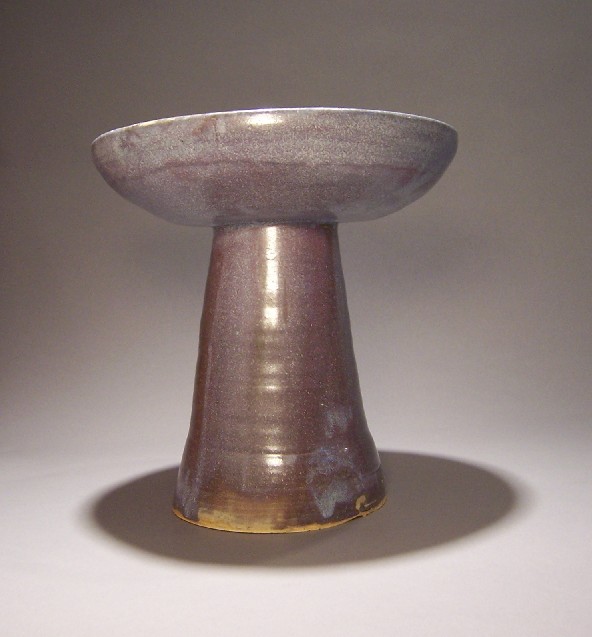
I had originally intended to finish these drums in time for Jeremy’s birthday, which falls in the last week of February (I began these in January).  I was too worried about cracks along the neck, which you can tell just by looking is going to be a major stress point, so I left them wrapped up in the greenware room until the last possible day.

Miraculously, they survived the first firing. I had already made test tiles, and Jeremy said he liked straight “purple haze” best. I liked the deep red of klear over emu, so I made this one with that combination.  Someone warned me that the glaze might drip, so the klear is just dripped with a turkey baster.

Usually I like just dipping my pieces into the 5 gallon glaze buckets.  You get an even coat, and since most of my bowls have huge feet, I have a ready-made handle.  These were too big, so I set them in a wide shallow basin and poured the glaze over the top.  It was a huge mess.  After wiping off the bottoms and feathering the thick parts by rubbing them gently, I set them on the glaze cart and hoped for the best.  The Tempe art center has a great tech, but I still worried about the stress on the neck joint.

And they came out with no cracks!  No dripped glaze either (it’s very bad if your piece ruins a kiln shelf because you got the glaze too thick.)  Now all that’s left is for Jeremy to attach the (commercially made) heads and see what they sound like.  (Don’t hold your breath. It might be a couple months before that happens.)

Posted in pottery | 1 Comment

Purple Haze Drum

March 28th, 2009 by Kater

purple-haze-drum1.jpgpurple-haze-drum2.jpg 

Jeremy had asked me to try to make a drum for him, and I said I’d give it a shot. It’s not an easy project.  Open bodied clays are easier for large projects, but they have a hollow sound rather than a ringing sound, which isn’t what he wanted.  If I coil-built it, I could make it huge, but if I coil built it it wouldn’t have as consistent a density, and again, that might comprimise the sound.

I started by centering about 10-12 lbs of B-mix.  Even though I did it in two sections, this still wasn’t easy.  Then I threw the bottom part, narrowing it until it was basically just a cylinder with the thinnest base I could manage. Throwing the bottom wasn’t too difficult, though if I had the foresight to brink a sketch of a drum in to begin with, I wouldn’t have made the neck so narrow.

He asked that the head be at least 10 inches in diameter.  Since it shrinks during drying, and again during firing, that meant I had to throw quite a large vessel for the top.  Since I was limited by the amount of clay I can center without it becoming waterlogged, the top had to be much more shallow than ideal.

I went in the next day to trim, and I had accidentally left one set of top and bottom unwrapped, which was serendiptious as the second drum (later post) was too wet. This was even a little too wet, so I used a heat gun on it.  This made hairline cracks!  I stopped with the heat immediately.

The wide vessel was lip down on a board, and I used the neck of the bottom to gauge the size of the hole.  I planned to invert the other section on top of it, but Bridget warned that it would collapse, so I ended up shoving wads of newspaper in through the hole until it looked like it would hold. Then I scored and slipped the neck to the base of the wide vessel, wrapped it tight, and put it on the shelf for a month.

The procedures for this and the second drum are essentially the same, so I’ll continue discussing the process in the next post.

Posted in pottery | No Comments

48 Birds #3: The trouble with beeswax

March 25th, 2009 by Kater

encaustic-wrapper-birds-sm.jpg

Every time I see beeswax collages in the art magazines, it looks really fabulous. Every time I try to replicate it, the results are messy and frustrating. I think it doesn’t help that I’m lacking the correct tools.  I use a heat gun and a ceramic dish (I learned not to use metal!) instead of a variable temp crock pot.

The effect I wanted to repliate was that of an etching, with very fine lines, and I wanted it whimsically unrealistic.  I wanted something like amonster in the background, so I drew one as poorly as I could using an 005 fine line marker.  You can still see the oval of the monster’s face.

I melted white beeswax and started layering it on.  This is messy, messy, messy.  As soon as it touches the paper, it solidifies, and yet when I use the heat gun directly on the paper, it soaks in making the watercolor paper look somewhat translucent.  I smeared it and smoothed it as best I could using a tiny palette knife that I’d bought for chinapainting.

Once that was done, I scratched the surface all over with a scraffito tool that’s very sharp.  This, surely, would give me the fine lines I wanted.  After that, I painted the whole thing with India ink, then wiped it off.  Um, not quite what I was looking for.  My assumption was that the ink would seep through where I’d scratched the wax away, soaking into the paper while resisting off the wax.  Instead, the ink stains the beeswax just fine.

A second problem emerged when I tried to attach the birds.  I’d cut them out of a chocolate wrapper I saved, and needed to attach them, but I presumed that nothing would stick well to wax except wax itself, so I got out my heat gun and another couple blobs of beeswax.  Naturally, the wax solidified as soon as I took it out of the ceramic vessel, so that the birds wouldn’t stick.  Eventually I got frustrated and just put the heat gun directly on the piece.  This made the ink blister off the melted wax, creating white blobs.  Finally I got the birds to stick, but one of them didn’t stand out well against the gray background, so I outlined it with ink, smearing it around the edges for a halo.

The only thing that went right with this is the photography.  On the premise that you can’t possibly have too much light when photographing art, I decided to just take it outside and shoot it under the noon sun.    I had to adjust the gamma downward in the editing, but except for that, I think I’ve hit upon a very successful, easy method of photographing 2D art. After all, if there’s one thing we have plenty of in Arizona, it’s sun. 

Posted in 48 Birds | 2 Comments

48 Birds #2: “There were facts about ravens she didn’t want the others to know.”

March 22nd, 2009 by Kater

second-collage-sm.jpgThis was a learning experience.

Once again I started with watercolor paper, and wrote on it with a calligraphy dip pen. I wrote “There were facts about ravens she didn’t want the others to know.”  Once again it became quickly apparent that plain writing on a white background is BORING.  When I’d finished with the paint washes and tissue paper layers, the writing was completly obscured. 

I’d added bits of other papers too, in keeping with the color theme.  One is the washi with stars, one is he striped handmade paper, and one is the vintage domino ad.  I saw something  in a magazine where there were stripes of pretty paper arching over a box. I painted an arched rectangle with gesso, then looked for papers. The paper I had didn’t look right.

So, instead, I outlined the box with blue oil pastel.  Suddenly the inside looked dull, so I drew inside it with the red oil pastel.  Oil pastels look a lot like crayon, but you can smear it a little.  Smearing it helped. A little. I tried to draw outlines with sharpies and ended up ruining two sharpies.  Sharpies do not like to draw on an oily surface.

I used a scraffito tool to scratch branches in the center of the rectangle, and a small figure in the transom arch.  Then I painted on the gesso with India ink and wiped it off.  That did not quite have the effect I had hoped for.  I was going to gesso a bird outline so I could paint it in with acrylic later, but once I’d painted the white bird I decided that was okay.

The writing at the top of the arch, in my opinion, was a disaster.  First of all, I misquoted myself.  Secondly, despite being afraid of ruining another sharpie, no other pen writes well on gesso. Thirdly, my lettering was terrible.

But the purpose of this project is not to create a series of masterpieces, it’s to practice and get better at mixed media.

Good news, camera tripods can hold spotlights too, which is good, because you apparently want a spot that is some distance away from the piece so as to avoid glare. I’m still not 100% happy with these photos.  Bad news, the spotlight clamp has a tendency to scratch the top of the tripod.  I have a plan for a better design, but it involves some things which may or may not exist at the hardware store.

Posted in 48 Birds | 1 Comment

Art Journal…Done!

March 19th, 2009 by Kater

last-aj-page-sm.jpg

This is the last set of pages of my art journal.

I was thinking about whether to work on my last entry in my art journal, or whether to start the collage project, and I ended up doing both. 

First I started writing out in ink ideas about what I wanted to try. This was both a way of working through the thought process, and creating a background for the artwork.  After that, I took two pieces of watercolor paper and started my collages. 

The two collages proved overwhelming for the pages, so after I trimmed the card shape out of them, I placed the frames on the pages to see how they looked.  I’d already done the crayon rubbing of the songbird (from the linoblock I cut) and I did a print on tissue paper thinking I’d use it for the other collage.  I like the way they mirror each other, and I like the way that the background text is just barely visible through the tissue paper.

Lesson learned from the art journal project: Art journals are very difficult to photograph.  Also, you can’t sew on any of the pages without sacrificing the watercolor paper background, which means you’re either not sewing, or you’re just gluing finished pieces onto a support.  The journal format also limits materials; you can’t choose anything too thick (poppy seed heads or doll faces) or too sticky (acrylic).  I’ve found this with altered books too.  The book form is really neither 3D or 2D, and has the worst of both worlds.  Of course, with altered books, you get the joy of recycling, so I may deal with the drawbacks and continue my other altered book projects.  Or maybe not.

Posted in Art Journal | No Comments

« Previous Entries

 
Wordpress Themes by and Website Templates by Blogcut