June 27th, 2010 by admin


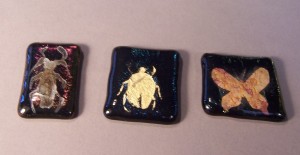
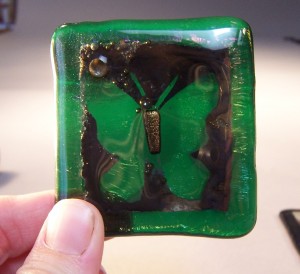
Now that I’d done a few beetles, I decided to see if I could make a butterfly that looked okay. Butterflies are easy to do poorly, and hard to do well. I find that if I stray too far from a photograph or good drawing of a butterfly, it doesn’t look as real as I’d like. I tried doing some butterflies that had the mica pigments in negative and the butterfly in positive. I think these look pretty good, as far as the shape.
One of the things I did here was try out the dichroic glass. Dichro glass is absolutely beautiful, and exorbitantly expensive. I bought a 2.5 oz scrap pack for about $26. If you buy it by the sheet, it starts a $1 a square inch. It’s stunning to look at, and some glass fusers do nothing but dichroic glass on simple backgrounds. I didn’t want to just cut chunks and pretend it was jewelry though, I wanted to make something. So here I used the dichro scraps for the body, and in one case the wings of butterflies.
The second picture shows what the glass looks like when you hold it up to the light. It’s iridescent green. The iridescence does funny things to the glass that’s on top of it, as I found out (and will explain more about in the next post.) The mica pigment also does funny things to the glass, namely, makes it not want to stick. I think that’s why I got those ugly air bubbles.
Posted in Glass | No Comments
June 24th, 2010 by admin

At this point in the class, I decided to just go and buy some more clear glass. If you ever take a glass fusing class, be aware that you will likely use more clear glass than any other color, for capping dichro if nothing else.
I hadn’t yet tested the mica pigments yet, so the one on the left isn’t great quality. That’s not why it looks mutant though. It looks mutant because someone suggested trying to draw on the glass with glue and using that to make a beetle. I tried it. It’s rather globular. The elmer’s glue bottle doesn’t have the control I want for fine art.
The butterfly on the right was a different color. I wish I knew which one. As you can see, it retained some of the pinkish hue of the pearl x mica pigment powder.
Posted in Uncategorized | No Comments
June 21st, 2010 by admin


For this dragonfly, I used a clear sheet over amber. The instructor suggested it for greater visibility. She didn’t quite understand that I was a skinflint who didn’t want to buy more clear glass, I guess. This was before I had tested the mica pigments to see which ones worked (bright gold) and which ones didn’t work at all (aluminum). I managed to pick one of the good colors, so the dragonfly came out very well.
Posted in Glass | 1 Comment
June 18th, 2010 by admin

This technique was something I kind of made up, because the other students in the class just did their own, straightforward projects. I saw that someone was using mica pigments on her glass work, and I have a bunch of those that I use for mixed media. Naturally, the ones made for glass are expensive.
When you fuse glass pieces together, you glue the glass with a special kind of glue that will burn out in the kiln. Some recommended elmer’s glue (it’s crap) and some recommended super glue (fine, but unforgiving) and other people ponied up for the glass glue (of course it costs more.) Then someone recommended hair spray.
To make these dragonflies, I started by taping masking tape over a sheet of amber glass. Then I used a very sharp exacto knife to cut out the dragonflies. I had printed out pictures of dragonflies before hand to use as a reference, but the cutting was done freehand. Using the tip of the blade, I lifted the center part of the tape out, then sprayed it with the hairspray. Before it was dried, I dusted it with mica pigments. Once the hairspray dried, I shook off the extra mica pigment, then carefully lifted the tape to reveal the dragonfly.
Part of the reason why I chose this concept was that I bought more tinted amber and yellow glass than clear glass, and I wanted something that would show even when the glass was not completely transparent. As you can see from the image, not all of the mica pigments work perfectly. The one at the bottom right is aluminum, and it burned up and turned black. The one at the top left burned, and made an air bubble which got trapped in between the glass sheets.
Posted in Glass | No Comments
June 15th, 2010 by admin
I took a fused glass class this spring. I hadn’t been terribly inspired by anything I’d seen in fused glass, but I figured that it was one of the few types of glassworking I hadn’t tried yet, so I ought to give it a go.
My first couple of pieces are really ugly. So ugly that I might not even show pictures of them here. One is a circle with a wave on it, and the other is a four-piece windchime/suncatcher, sprinkled with some broken stringers I made. I don’t like them at all. They have the same craft-kit feel that I see in a lot of fused glass, and they seem kind of kitchy.
I wanted to make something that felt like art. I also wanted to make something that wouldn’t involve a second trip to the glass store, because my first supply run had set me back a hundred bucks–and I bought stuff from the scrap rack! I had a lot of this amber colored glass, and I had some mica pigments, so I thought about what insects look like when they’re trapped in amber, and I came up with the idea to make these beetles. Next post, I’ll talk about how I did it.
Posted in Glass | No Comments