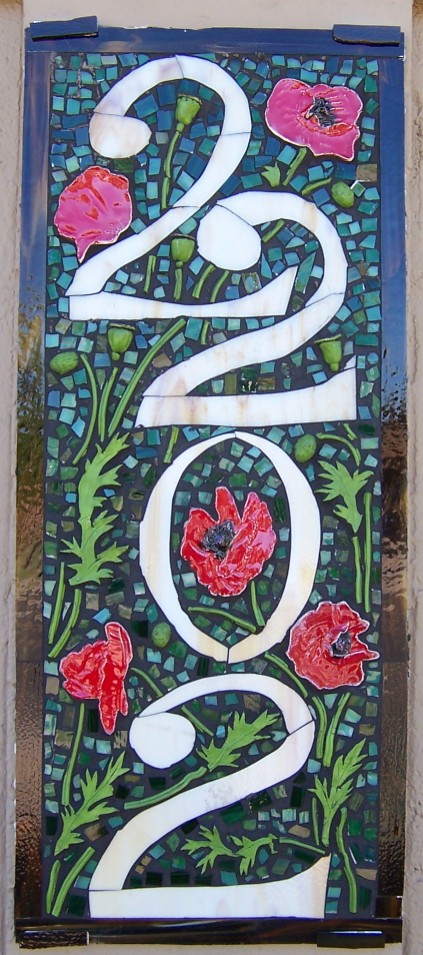
Here’s the finished number plaque that I made the poppy tiles for (shown in an earlier post). I cut the background green tiles out of stained glass, with the help of my daughters (since ones hand hurts after cutting too many tiles, I needed help.) Cutting the background tiles was rather time-consuming, but it saves a lot of money to cut them yourself instead of purchasing tesserae from the craft store.
I’d made the general design for this plaque before I made my first poppy tile. First I looked at different fonts until I decided how I wanted the numerals to look. Then I sketched it out on a full-size piece of paper, in the same size as the location it was going to be installed in. Once I had the poppy tiles out of the kiln, I was ready to cut the white glass to fit the numerals. I didn’t have to be very accurate, since the grout would cover the space between the glass, and the faint lines where the glass broke only added character.
I cut strips of the brown glass for the edges. I used brown because I had a lot of it, and because I wanted only dark colors to contrast with the white numerals. If the numbers were hard to see, the piece wouldn’t be functional, and I’m all about functional art.
I used white mastic to make the best use of the glass translucency. I made a couple tiny mistakes with the placement of the poppies, but I’m not going to point them out because I’m hoping I’m the only one who notices. I had some problem mixing the mastic because the bag of dried mastic and the tub mastic mixing latex had completely different directions for the correct proportions. I mixed it first, and it turned out sloppy, like pancake batter, so I used the second directions, and it was too thick, like toothpaste. In the future, I think I shall use the sloppier directions so that I have a thinner coat of mastic with better adhesion. I lost a few green tesserae because they didn’t stick very well. I am glad my kids helped me stick the green tesserae. One has to work fast when the mastic is already half-dried.
After the mastic cured, I mixed up the grount and began spreading it. When you’re spreading grout on a normal tile surface, say, a bathroom wall or a floor, you are supposed to wash off the haze with a strong sponge and clean water. I learned from this project that that is a poor idea. Because the proportion of grout to tile is so much greater than a normal tiled surface, the water washed too much grout off and exposed the white mastic underneath. Our better bet was to use terrycloth rags, dried, and just throw them away when they got dirty.
The black grout really made the numbers and the colors of the flowers pop. I knew I’d chosen the right colors for this. I left it inside for a few weeks so that the grout could cure, and then I asked my husband to help me install it. We weren’t sure what kind of brackets would be best, but I’d had some “Gorm” shelf brackets from an Ikea shelf that I didn’t use, and we got my dad to drill a larger hole in one side with a drill press so that we could bolt them to the wall. I thought we’d be able to slide the 1/2″ thick mosaic in to the 1/2″ thick groove, but that didn’t work. Some of the mastic had spilled over in places, and it just plain didn’t work. We eventually bent the brackets out and then bent them back once the mosaic was in place. So, it’s not going anywhere.
I wanted to cover the metal brackets, so once it was done, I cut pieces of the same brown glass and covered the metal, gluing it on with E6000 glue (which my glass teacher said was ideal for metal-to-glass applications.) One of them went on at an angle, as the bracket didn’t get bent back perfectly, but you can’t see it from the street. Of all the projects I’ve done this year, this is probably the one I’m most proud of.
If anyone wants to hire me to make a number plaque for their house, the answer is NO. This took me a month of work, and if I were to charge a fair wage for time and materials, it would price this way beyond what most people were willing to pay. But I’ll give you pointers on making your own, for free!


1 comments
I love this. 🙂