• Home
  • About Kater Cheek
  • Writing Resume
  • Contact

Kater’s Art

artblog and writing resume

Categories

  • 48 Birds
  • alternart
  • Art Journal
  • books
  • Clarion
  • collage
  • doll/faeries
  • drawing
  • Glass
  • henna
  • Postcard
  • pottery
  • Printmaking
  • shrine
  • smiley ball
  • Tiles
  • Uncategorized
  • wood

Books!

  • Dayrunner
  • Seeing Things
  • Treemaker

My other sites

  • Occasionally Offensive

Meta

  • Log in
  • Entries RSS
  • Comments RSS
  • WordPress.org

Big Critter’s Crown

January 31st, 2011 by Kater

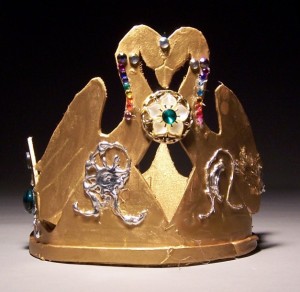
This is the crown that Big Critter made.  She also didn’t like a radially symmetrical design.  She sketched what she was thinking of, and I helped her design it.  For the shiny gold parts, she drew a design with hot glue, and then applied gold leaf directly to the cooled glue.  It works very well.  I made them use the opposite color of metal for those, however, because the shininess of the gold leaf makes the crown base look too dull.

Posted in alternart | No Comments

Little Critter’s Crown

January 28th, 2011 by Kater

When I made my crown, I made it radially symmetrical, and it didn’t occur to me that the kids would want anything else.  However, they are people, and people have their own minds.  Little Critter wanted it more like a tiara, and she wanted swans.  It took some doing, but I was able to oblige.  Both her and Big Critter wanted to use that floral button in the center, but I was able to mollify Big Critter by letting her use an entire pack of snowflake rhinestones.

Posted in alternart | No Comments

Mosaic Tiles 1

January 25th, 2011 by Kater

I made these tiles in this shape more because it was convenient to cut them than that they will do well in a mosaic. Actually, I’ve thought it would be really cool if I had cookie cutters in the shapes of tiles like are used in Islamic design. I haven’t yet seen any for sale. May have to make some.

This is “evergreen” on “ward’s red” clay.  This is the first time I’ve had it come out green.  Often it comes out an iron red.  The kiln overfired by quite a bit, so that may have had something to do with it.

Posted in Tiles | No Comments

Crown

January 19th, 2011 by Kater

I made this crown so that my kids would have something fun to play with, since they often like to play princesses and queens and whatnot. I used a technique given to me by a costumer at Westercon to make brigandine armor. I’m sorry to say I forgot which costumer told me this, but I found other sites online that talked about a similar technique, so maybe it’s fairly common.

You start with funfoam. When I bought this, they only had one thickness, but if you can get the 3mm or thicker, it works a little better.  I measured my head, then cut a piece of paper the same length as the circumference of my head. I folded it in half, then thirds, then half again and cut out a pattern so that when I opened it it was repeated like paper dolls.  Then I laid it out on the fun foam.

One thing you may notice is that there are several breaks in the pattern. This is inevitable, as the funfoam was only 18″ long, and my head is 23″ in circumference.  I tried to not let the breaks overlap so that it would be stronger.  I added the secondary pattern, with the interspaced bumps, when I noticed that the first one wasn’t strong enough.

Once I’d attached both the primary and the secondary patterns, I glued a piece of thin cotton cloth. I do not recommend doing it in this order.  Cutting the foam out with such deep lobes was hard enough the first time, and cutting it the second time (my scissors were dull, and I dared not use the good sewing scissors for this) made me want to rip my hair out in frustration. I couldn’t even use a razor blade very well.  It’s very difficult to cut it when it’s in a circle like this. If you try this at home, do all of your cutting when it’s lying flat.

After I cut it, I used an embossing tool to indent lines for decoration.  They’re kind of faint in the photo.  Originally, the crown was much taller, but I found that it was too floppy.  It’s still fairly tall, maybe six inches.  I painted it with a mixture of water, white glue, and gold acrylic paint.  Several thin coats would have been much better than four gloppy ones, but I didn’t have the paint ratios right. And let’s be honest, I didn’t want to spend too much time in something that was just for fun.

I used an eyelet setting tool to make faint circles all along the band at the bottom, and then I glued that on top of the crown. I also glued the diamond shapes in the center of the oak leaf shapes.  It still needed more frou-frou, so then I used a hot glue gun to make the dots.  I had to do this slowly so that the glue dots didn’t turn into glue ovals.

Once I’d done about as much painting as I was willing to do, I let it dry and then covered the whole thing with gold rub-n-buff. This is a waxy metallic coloring agent that has some kind of turpentine/oil base.  The gold acrylic already made it kind of metallic, but the rub-n-buff sort of binds together and gives it a more even sheen. If I had a smoother original base, I’d imagine it would look even more metallic.  Once that dried, I glued on the acrylic jewels and the centerpieces–two hideously gaudy buttons that cried out for this purpose.

I would recommend a similar project for any crafty person who has daughters (or sons!) who like to play. It’s a great prop for role-playing. Who doesn’t want to be royalty now and then?

Posted in alternart | No Comments

Gift Bag

January 17th, 2011 by Kater

Why do I have a picture of a gift bag? Surely it’s not because I ran out of art and wanted to use something as filler. Surely not!

I was lucky enough to receive a gift card, and it came in a bag much like this.  The bag intrigued me, so I took it apart and made a template so I could re-create it.  A piece of scrapbooking paper is large enough for the base, and I just got a few pads of nice 12″ x12″ paper with designs on both sides.

I’m still working on the folding. My templates aren’t completely accurate, and I had to adjust the folds to get them to sit better. It’s the perfect size to hold a few tiny smiley balls.

Posted in alternart | No Comments

« Previous Entries

 
Wordpress Themes by and Website Templates by Blogcut